|
|
 |
|
Build your own antenna
matching device
Improve Sony 2010 reception
By Robert Colegrove
The
most serious problem with the Sony ICF-2010 has been well
documented over the years and concerns the vulnerability of the
RF amplifier transistor to electrostatic discharge. When a 1/8-inch
phone plug is inserted into the external antenna jack, any voltage
present on the attached wire is ported to the gate of the FET.
|
"There
is significant impedance mismatch between most shortwave antennas
and the receiver. This prevents the antenna from delivering
maximum voltage to the receiver at most frequencies."
|
Most of these
transistors have a maximum voltage rating on the order of 40 volts
peak. Static discharge from body contact or nearby high impedance
fields, such as those caused by lightning can reach hundreds or
even thousands of volts. Bear in mind your receiver doesn't have
to take a direct hit. A high impedance electric field can induce
a destructive voltage along a wire.
Examination of the schematic furnished in the Sony service manual
shows that the whip antenna is given some protection with a pair
of zener diodes. External antennas designed to protect the receiver's
input circuit may be used with relative safety; however, there is
still a danger when inserting or removing the plug.
The second problem affects performance. The gate circuit
of a FET, such as the RF amplifier in the 2010 is high impedance.
Since the antenna is directly coupled to the gate, the antenna output
impedance should also be high impedance in order to provide optimum
signal transfer. However, typical antennas, such as dipoles, loops
or any antenna having a transmission line have relatively low impedances
on the order of 50 to 300 ohms. A long wire will have a variable
impedance which is a function of the length of the wire and the
frequency. The bottom line is that there is significant impedance
mismatch between most shortwave antennas and the receiver. This
prevents the antenna from delivering maximum voltage to the receiver
at most frequencies.
The third problem is also one of performance. It is characteristic
of virtually all digitally-tuned portable receivers. It is the lack
of dynamic range. In the old days, the input circuits were tuned
with coils and variable capacitors. As you tuned in a station, a
significant portion of the unwanted RF spectrum was filtered out
right at the receiver input. To date, there is no easy inexpensive
way to do this with a digitally-tuned receiver. As a result, every
signal present on the end of the antenna is fed into the receiver.
Once inside, everything gets amplified. Sufficiently strong signals
will overload the remaining RF processing circuits and cause effects
we know as cross-modulation or inter-modulation. The effects are
most noticeable under good shortwave propagation conditions when
everything across the band sounds like mush and you hear lots of
stations where they are not supposed to be. Most receivers have
a so called "DX/LOCAL" switch to provide a modest amount of relief.
The Sony approach is typical. In the local position a voltage divider
is inserted early on in the circuit to attenuate the incoming signals.
An alternate approach is to shorten the antenna. In either case,
the signal grabbing power of the antenna and receiver system is
greatly reduced.
The remedy
A solution to these problems involves
1. protecting the receiver's input,
2. improving the impedance match between the antenna and
the receiver, and
3. attenuating at least some of the unwanted signal level
before it reaches the receiver.
Given the complex tightly packaged receiver design. There is very
little the hobbyist can do inside the receiver case. On one of my
own receivers, I removed the external jack so that its mere presence
would not invite disaster. I had already ruined three RF amplifiers
before I fully understood what was happening. Simply removing the
jack from the circuit board; however, creates another problem. Two
switch closures are made inside the jack with the plug removed.
Jumpers must be soldered on the circuit board in order to make the
receiver operate with the jack removed. This is an operation which
I don't recommend.
My final design, therefore, had a fourth requirement - that
no internal modifications be made to the receiver. This further
restricts what the hobbyist can do. It leaves the whip antenna as
the point of input. Access to the receiver ground can be gained
through either of the exposed antenna jacks.
My first thought was to design a pi matching network. These were
the tried and true impedance matching circuits years ago. A simple
network consists of a series coil with a variable capacitor shunted
across the input and a second capacitor across the output. Each
time you tune to a new band, the capacitors are tuned to peak the
signal. Peak tuning indicates an impedance match has been found.
Note that this is not the same thing as a resonant circuit. Simple
impedance matching does reject a certain amount of adjacent signal
interference; however, not nearly as much as a resonant circuit.
Unfortunately, good variable capacitors have gone the way of the
vacuum tube. Digital tuning has rendered them virtually extinct.
For a while, I was salvaging them out of old radios, but these are
generally bulky with respect to modern electronic components and
often have to be padded with fixed capacitors to achieve the correct
capacitance range.
To make a long story short, my final design is essentially a variable
autotransformer. An autotransformer is an impedance matching device,
which, unlike a multi-coil transformer, has only one coil with the
input and output using different taps.
|
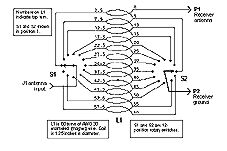
Impedance
matching device to improve reception on a Sony ICF-2010.
(Click on image for full size diagram)
|
Construction
The circuit has three parts, a coil, which you must fabricate
yourself and two commercial rotary switches to vary the input and
output impedances. Twelve-position rotary switches (Radio Shack
part number 275-1385) are used on the input (antenna side) and on
the output (receiver side). The antenna is connected to the wiper
of the input switch and the 12 poles are connected to taps along
the coil. The wiper of the output switch is connected to the receiver
ground (the outer sleeve of either external antenna jack). The 12
poles of the output switch are connected to different taps along
the coil. Turn 0 on the coil is connected to the whip antenna. The
table shows the exact tap connections.
|
Switch
Pole
Number
|
Antenna
Switch
Coil Turn
|
Receiver
Switch
Coil Turn
|
|
1
|
2.5
|
5
|
|
2
|
7.5
|
10
|
|
3
|
12.5
|
15
|
|
4
|
17.5
|
20
|
|
5
|
22.5
|
25
|
|
6
|
27.5
|
30
|
|
7
|
32.5
|
35
|
|
8
|
37.5
|
40
|
|
9
|
42.5
|
45
|
|
10
|
47.5
|
50
|
|
11
|
52.5
|
55
|
|
12
|
57.2
|
60
|
The coil is
60 turns of AWG 30 copper enameled wire. Turns are wound tightly
in a single layer. The coil has an approximate diameter of 1 1/4
inches. I used an old plastic 35-mm film can as a coil form. Taps
are made every 2 1/2 turns as you wind the coil, stripping away
about 1/8-inch of the enamel insulation and soldering a 3 or 4-inch
connecting wire for eventual connection to the switches. I used
the AWG 30 copper enameled wire for the taps to reduce the bulk
and stress on the solder connections.
The switches come with a tab which prevents 360 degree rotation.
This should be bent out of the way to permit full rotation and facilitate
operation. The switches should be mounted on either side of the
coil in a small project box. I used a phone jack for the antenna
input. The output leads for the antenna and ground should be kept
separated from one another and as short as possible - no more than
8 inches. Alligator clips can be used to connect each lead to the
receiver. I fabricated a special clip to grip the swivel base of
the whip antenna. The ground connection is tricky. You don't want
to use a standard phono plug, as that will switch the contacts inside
the jack and cause problems. You only need to make contact with
the outer sleeve, so a sawed off phono plug might work well. If
you are using a dipole antenna or any antenna requiring a ground
connection the input ground can be made to the receiver ground inside
the coupler box.
Operation
Tune the receiver to the desired shortwave band. Alternately
adjust the input and output switches until you obtain maximum signal
indication on the receiver LED's. The changes in signal level may
be subtle, so you should adjust each switch two or three times and
note any improvement. There may be two or three switch combinations
which produce nearly optimum response.
It is advisable to make a chart of switch settings for each band
of frequencies you tune. The chart should have three columns, one
for the frequency band and one for each of the switch positions.
It is best to determine the optimum switch settings during daylight
hours when signal levels are not as strong.
Once you have established the optimum switch settings, they
will remain the same as long as you don't change the antenna. If
you change the antenna length or type, you will have to determine
new settings for the coupler. Generally, the same switch settings
will remain optimum over a 200 to 500 kHz band. You will not find
a consistent pattern or progression of switch settings as you go
up or down the shortwave spectrum. Thus the settings will have to
be determined experimentally for each band.
Changes produced by adjusting either switch can be subtle or dramatic.
Results, as indicated on the receiver's LED signal strength indicator
can be negligible or produce as much as a 4 LED increase over operation
without the coupler. Improvement depends on the amount of mismatch
between the antenna and the receiver at the frequency being tuned.
Regardless of the gain in signal strength, the coupler will help
attenuate out-of-band signals which don't match the impedance. This
results in less frequent use of the DX/LOCAL switch and better use
of the receiver's available sensitivity. You might call this better
dynamic range, although it is being manually controlled. In some
cases, it will be found that tuning the coupler slightly off the
optimum signal strength setting will virtually eliminate overload
with the DX/LOCAL switch in the DX position. This may produce a
more desirable setting.
It is interesting to note that the coupler will also affect
FM reception, and, to a lesser extent MW reception. However, the
effect is not always an improvement and you may want to disconnect
the coupler whenever listening to the MW or FM bands.
Regarding long wire antennas, it has been this writer's experience
that anything over 25 feet in length yields diminishing returns,
and, in fact, may promote reception of noise or signal overloading.
A few simple rules suffice:
1. Keep the wire as high as possible.
2. Avoid proximity to TV sets, computers and other sources
of RF radiation and noise.
3. Keep the wire away from metal shields such as aluminum
siding, conduit or furnace ducts.
Good DXing.
|
|
|